>

Thursday, December 8, 2011

Baked Tofu

Baked Tofu

Here is an ingenious kitchen tool which I cannot stop talking about. It's a tofu press which I think is a great handy kitchen tool to have. I purchased my tofu press from Amazon.com. What I love about this tofu press is that it easily presses out all the water from the tofu without wasting a lot of paper towel and finding heavy plates/objects to balance on top of your tofu to press out the water. The tofu press is one gadget I am so glad I had purchased. You can learn more about the tofu press from the maker of this press: TofuXpress.com. I bake a lot of tofu, so I really love this gadget.

There are various ways to bake tofu, but I like my tofu very simple and plain where the tofu is versatile in any grain salads, pasta or rice dishes. You can purchase baked tofu in most supermarket or health food stores, but baked tofu are a pit pricey. Baking your own tofu tastes better and has a better texture, besides being inexpensive to making your own. Well...the tofu press may be a bit pricey, but well worth the investment. Here's how the tofu press works:
.

The tofu press consists of a container (to contain the tofu) and a top (presses down on the tofu). The top consists of 3 parts which easily comes apart.


Remove the tofu from its packaging (I purchase a 14-ounce package of extra-firm tofu and it fits perfectly into the tofu press). Then place the tofu into the container. After attaching the top to the container, you can see immediately that the water is starting to press out of the tofu. I usually let this sit overnight in the refrigerator.


The next day, you can see a lot of water pressed out of the tofu. Pour out all the water into the sink and your tofu is now ready for cooking.


Here is a basic recipe for baked tofu. I like to cut my tofu into cubes and then toss with a tablespoon of olive oil (or Garlic-Infused Olive Oil) and some salt to taste.


Bake in the center of a preheated 400-degree oven. Bake for 20 minutes, turn each cube over and bake for additional 15 to 20 minutes or until golden brown. I can eat the tofu just baked this way as a snack and other times I like to toss them with Maangchi's seasoned sauce (yangnyeomjang) which is great eaten with rice or soba noodles.

What is your favorite way to bake tofu?

Wednesday, November 30, 2011

Maple Sweet Potato Puree

Maple Sweet Potato Puree


This is a very simple sweet potato recipe which I love to make year round or as long as Garnet sweet potatoes are available. Using 100% pure maple syrup instead of brown sugar makes the puree less sweet with a robust maple flavor. Do not substitute maple syrup for the imitation pancake syrup. They are not the same. I normally make a very large quantity of this recipe so that I can eat this as my lunch. I can just eat this all on its own and be satisfied. Sweet potatoes are the healthiest vegetable on the planet. Sweet potatoes are great complex carbohydrates loaded with Vitamin A, Vitamin C, Vitamin E, iron, potassium and fiber. They are also fat-free, cholesterol-free and very low sodium.

Garnet sweet potatoes are my favorite variety of the orange-fleshed sweet potatoes because it's more starchier, moist and flavorful compared to the Beauregard and Jewel varieties. Peak season for the Garnet variety is September to March. According to the North Carolina Sweet Potato Commission, Garnet "yams" as labeled in the supermarkets, are really sweet potatoes. North Carolina is the largest producers of sweet potatoes in the U.S., while China is the largest producer of sweet potatoes in the world.

5 pounds Garnet sweet potatoes
1/4 cup unsweetened fresh coconut milk or 2% reduced fat milk (2.0 ounces)
2 tablespoons unsalted butter, melted (1 ounces)
2 teaspoons organic unsulfured blackstrap molasses or any grade of your choice (0.3 ounce) (Optional)

1/2 cup 100% pure Grade A, dark amber maple syrup (5.2 ounces)
3/4 teaspoon salt


Preheat oven to 350 degrees. Position oven rack to center of the oven.

Scrub sweet potatoes clean under cold water and damp dry. Cut off pointy ends of each sweet potato (if you cut off the pointy ends, you don't need to prick the sweet potatoes). Wrap each sweet potatoes in aluminum foil and place on a sheet pan. Bake for about 1 to 1-3/4 hours, depending on the size, until knife tender when inserted into center of the sweet potato (start checking after 1 hour). Remove from oven and let sweet potatoes cool until cool enough to handle. Peel and discard the skin and cut into large chunks into the bowl of a food processor.

In a microwavable measuring cup or small bowl, heat the milk in the microwave for about 25 seconds on high power. Stir in the molasses, butter and maple syrup until blended. 

Add the milk/molasses/syrup mixture and salt to the sweet potatoes. Process until thoroughly combined and smooth. Transfer to a serving dish.

Yields 10 to 12 servings

Wednesday, November 16, 2011

Slow Cooker 28-Bean Soup

Slow Cooker 28-Bean Soup

Yes, there are really 28 varieties of beans in this soup. Not kidding!

Tuesday, November 8, 2011

Soybean Sprout Bibimbap

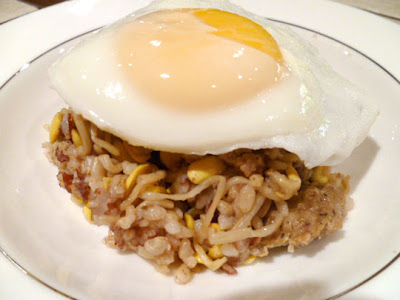
Soybean Sprout Bibimbap with Multi-Grain Rice and Ground Turkey
Adapted from Maanghi.com

Soybean Sprout Bibimbap is a Korean rice dish cooked with meat and soybean sprouts. It is served with an egg cooked over-easy. To eat, you will break up the egg into the rice; then mix the rice mixture and the egg together with a few spoonfuls of homemade seasoned sauce (yangnyeomjang).

This dish is so amazingly delicious and healthy! The soy beans from the soybean sprouts has a nice delicate crunch and the seasoned sauce mixed together with the rice is so flavorful and addicting. You may have extra seasoned sauce when all the rice is eaten up, but there are other uses for the seasoned sauce. I actually use the remaining sauce with Baked Tofu and I'm sure the seasoned sauce will also be delicious eaten with fish, soba noodles, steamed vegetables, etc. It is amazingly delicious!!

I modified Maangchi's recipe to be cooked with multi-grain rice and replaced the ground beef for ground lean turkey. Since we love this dish so much, I doubled the recipe so we can enjoy this rice for a few more dinners.

1-1/2 cups medium-grain brown rice (9.9 ounces), washed and drained
1/2 cup Thai red cargo rice (3.2 ounces) or black medium-grain rice (3.5 ounces), washed and drained
3 cups cold water (24 ounces or 1:8.0 pounds)

Two pounds soybean sprouts
12 ounces lean ground turkey or ground chicken
1 tablespoon Bragg Liquid Aminos or low-sodium soy sauce (0.4 ounce)
1 tablespoon sesame oil (0.3 ounce)
1/2 teaspoon ground black pepper

1/2 cup Bragg Liquid Aminos or low-sodium soy sauce (4.5 ounces)
4 garlic cloves, minced (0.6 to 0.8 ounce)
2 stalks green onions, thinly sliced (1.0 ounce)
3 tablespoons finely chopped yellow onion (1.0 ounce)
1 small jalapeno or serrano chili pepper, thinly sliced or coarsely chopped (optional)
4 teaspoons Korean coarse hot pepper flakes (0.3 ounce)
1 tablespoon agave nectar or honey (0.5 ounce)
2 tablespoon sesame oil (0.6 ounce)
2 tablespoons roasted white sesame seeds (0.4 ounce)

6 eggs (any size)

In a 6-quart stock pot, combine the brown rice, red rice and water. (Note: You can use entirely 2 cups of brown rice (13.2 ounces) if you do not have red or black rice.) Set aside to let rice soak for about 1 hour.

While rice is soaking, remove root ends of each soybean sprout and discard any discolored rotten sprouts or remove discolored rotten soybeans, but save the healthy sprouts (do this while watching your favorite television program). Wash well in several changes of water. Transfer to a large colander and set aside.

Season the ground turkey with 1 tablespoon Bragg Liquid Aminos, 1 tablespoon sesame oil and ground black pepper. Mix well and set aside.

Bring the pot of rice to a boil on high heat (do not need to change water). When rice comes to a full boil, give rice a stir and cover pot. Reduce heat to low heat. Let rice cook undisturbed for 15 minutes.

While rice is cooking, make the seasoned sauce (yangnyeomjang): Combine 1/2 cup Bragg Liquid Aminos, garlic, green onion, yellow onion, jalapeno chili pepper (optional), Korean hot pepper flakes, agave nectar, 2 tablespoons sesame oil and sesame seeds in a small bowl. Stir well to combine. Set aside.

After the rice have been cooking for 15 minutes, increase heat to medium-low heat. Add the entire soybean sprouts on top of the rice. Spread the ground turkey mixture on top of the soybean sprouts. Immediately cover pot and continue to cook on medium-low heat for additional 25 minutes, undisturbed. After 25 minutes of cooking, remove the pot of rice from the heat. Transfer the ground turkey patty to a plate. Cover the pot of rice and let the rice rest off the heat. Break up the turkey patty to smaller bite-size pieces. Return turkey pieces back to the pot of rice and give the rice mixture a good toss to evenly incorporate the soybean sprouts, ground turkey and the rice.

NOTE: You can stop at this point if you decide to make this rice early in the day or even one day in advance. The rice mixture and seasoned sauce can be refrigerated in an airtight container. When ready to eat, just reheat the rice in the microwave and poach-fry your egg.

When ready to eat, either you can fry your egg over-easy the traditional way or you can follow my instructions for Poach-Fried Eggs.

For each serving, scoop one-sixth portion of the rice mixture into a shallow bowl. Place a poached-fried egg on top. Pass the seasoned sauce to be served with the rice. To eat, break up the egg into the rice. Add 2 to 3 spoonfuls of the seasoned sauce over the rice mixture, mixed everything together and it is ready to eat. You can also tear up a few sheets of Korean roasted seaweed on top of the rice and/or sprinkle with some roasted black sesame seeds. Even more delicious!

Yield 6 servings

Soybean Sprout Bibimbap served in a shallow bowl with a
Poach-Fried Egg on top.

Before you eat, break up the egg into the rice mixture.

Add 2 to 3 spoonfuls of the homemade seasoned sauce (yangnyeomjang) to the rice mixture.

 Thoroughly mix everything together.
(The rice is hot - notice the steam on the lower left of the photo.)

Now it is ready to eat!
You can also tear up several sheets of Korean roasted seaweed and place it on top of the rice mixture. The roasted seaweed adds another depth of flavor to the bibimbap.

Wednesday, November 2, 2011

Poached-Fried Egg

Poached-Fried Egg

I am so excited to share with you a way to "poach-fry" an egg, sunny side up. I learn this from watching The Chew. One of the host, Daphne Oz (Dr. Oz's daughter), was demonstrating how to poach an egg using a nonstick frying pan. So easy and it really works. I have already tried this method of "poach-frying" an egg twice and has not failed. Not only is it easy, but clean up is easy-peasy. To watch Daphne demonstrate this on video, watch it here and fast forward the video to 2:32. This cooking method is somewhat poaching...or steaming...or frying?!? Whatever cooking method this is categorized as, this is an INGENIOUS and HEALTHY way to poach-fry an egg! Here's how:

1 teaspoon olive oil
One egg (any size)
Salt to taste
2 tablespoons water

Place an 8-inch nonstick skillet over medium-low heat (4.0 on induction cook top) and wipe the inside surface with olive oil to sheet-coat the pan. Let the pan heat up for about 5 minutes or until hot (remember it's only on medium-low heat). Smelling the fragrant of the olive oil is another indication. Add one egg into the heated pan. Sprinkle with some salt to taste. Add the water to the pan and cover immediately. What is happening is the water will steam up and cook the egg.


Let the egg continue to cook, undisturbed, for 2 to 3 minutes or until the egg white is completely cooked, but the yolk is still runny. Transfer egg to a plate and it is ready to eat.


Repeat the same cooking process if you are cooking more than one egg.

To change note here, our dinner tonight, I "poached-fried" three eggs to be served with Soybean Sprout Bibimbap, a Korean rice dish from maangchi.com website.


Soybean Sprout Bibimbap is a Korean rice dish cooked with meat and soybean sprouts. It is served with an egg cooked sunny side up or over-easy. To eat, you will break up the egg into the rice; then mix the rice mixture and the egg together with a few spoonfuls of homemade seasoned sauce (yangnyeomjang) which will then look like the photo below:


This dish is so amazingly delicious and healthy! The soy beans from the soybean sprouts has a nice delicate crunch and the seasoned sauce mixed together with the rice is so flavorful and addicting. I'm sure the seasoned sauce alone will be delicious eaten with baked tofu, fish, noodles, etc. It is amazingly delicious!! Maangchi also has a you-tube video demonstration (take a look below):


I modified the Soybean Sprout Bibimbap recipe to be cooked with a combination of brown and Thai red cargo rice and substituting ground turkey in place of ground beef. I am real close to perfecting Maangchi's recipe to be cooked with the multi-grain rice. Brown rice takes longer to cook which makes the cooking process different from Maangchi's version so that is why I want to perfect the brown rice version before posting. As soon as my modified version is perfect, I will be posting my version using multi-grain rice, ground turkey and plus doubling the recipe since a few of Maangchi's readers have inquired whether the recipe can be doubled.

UPDATE: My doubled recipe of my version of Soybean Sprout Bibimbap cooked with multi-grain rice and ground turkey is finally posted here: Soybean Sprout Bibimbap with Multi-Grain Rice and Ground Turkey. Check it out!

Thursday, October 20, 2011

Savory Steamed Custard

Savory Steamed Custard
Adapted from Migi's Kitchen


This is a savory steamed custard that is eaten with rice. The delicate silky texture is achieved from the art of steaming. Thanks to Migi's Kitchen website where I learn to master steamed custard. I like my savory custard simple and plain. You can substitute the water for vegetable stock, chicken stock, or even seafood stock or dashi. You can add a few fresh shrimp or shitake mushrooms  (Japanese version), salted shrimp sauce (Korean version) or dried shrimp and Chinese sausages (Chinese version), but I just like it plain. This is such a simple, quick and healthy dish to make.

1-1/2 cups cold water (12 ounces)
1-1/4 teaspoon salt
1/2 teaspoon sesame oil
3 large or extra large eggs, beaten (5.4 to 6.0 ounces)
1-1/2 teaspoons finely chopped green onions

In a medium-size bowl, combine the water, salt and sesame oil. Strain the beaten eggs into the water mixture through a fine sieve. Whisk until combined. Cover the bowl with plastic wrap. Steam on medium-high heat (7.0 on induction cook top) for 10 minutes; then reduce heat to low heat (2.0 on induction cook top) and steam for additional 8 minutes. Custard is firm on the sides and slightly jiggly in the center.

Yield 3 to 4 servings

 
 What's for Lunch?
Brown rice topped with Savory Steamed Custard, Steamed Spinach and sprinkled with roasted sesame seeds.

Sunday, October 9, 2011

Banana-Cinnamon Waffles

Banana-Cinnamon Waffles

100% whole-grain and 100% delicious! Just a hint of cinnamon not to overpower the banana flavor, but you can add more cinnamon if you like.


2/3 cup whole-wheat pastry flour (2.8 ounces)
1/2 cup whole-wheat flour (2.3 ounces)
1/2 cup soy flour (1.0 ounce)
1/4 cup buckwheat flour (1.0 ounce)
1/4 cup ground flax seeds (0.8 ounce)
2 tablespoons evaporated cane juice (0.6 ounce)
2 teaspoons aluminum-free baking powder
1/8 teaspoon ground cinnamon or to taste
1/4 teaspoon salt
1-3/4 cups Silk Brand unsweetened plain soy milk or unsweetened almond milk (14 ounces)
3 tablespoons EXTRA LIGHT olive oil or expeller-pressed canola oil (0.9 ounce)
2 large eggs, beaten (3.6 to 3.8 ounces)
1/2 teaspoon vanilla extract
About 1-3/4 large-size very ripe banana, fork mashed (9.6 ounces)

In a very large mixing bowl, combine all four types of flours, flax seeds, sugar, baking powder, cinnamon and salt. Stir well with a whisk to combine all the ingredients together. Set aside.

In a medium-size bowl or a 4-cup measuring cup, combine the soy milk, oil, eggs and vanilla extract. Whisk together until combined. Add the soy milk mixture to the flour mixture, stirring with a whisk just until blended. Fold in mashed bananas. Set aside.

Preheat a waffle iron for about 15 to 20 minutes. Coat waffle iron with nonstick cooking spray. Spread a generous 3/4 cup of batter for two 4-inch thick waffles onto hot waffle iron, spreading batter to the edges with a spatula. Cook for 4 minutes or until steaming stops. Repeat cooking procedure with remaining batter.

Top waffles with sliced fresh bananas and drizzle 100% maple syrup over waffles.

Store any leftover waffles in a plastic bag in the refrigerator. To reheat, place waffles in a toaster.

Another breakfast tips: Toast leftover waffles and spread with almond butter. You can also top the almond butter with fresh sliced bananas. You can eat it open-faced or top with another toasted waffle to make a breakfast sandwich.

Yields ten 4-inch thick waffles

Wednesday, October 5, 2011

Oatmeal with Roasted Black Sesame Seeds and Goji Berries

I stayed with my parents for 2-1/2 weeks. During my stay, my father cooked this delicious oatmeal with ground black sesame seeds and Goji berries. At first glance, it didn't look appetizing because the ground roasted black sesame seeds made the oatmeal a bit grayish in color. I LOVE sesame seeds. I sprinkle roasted black and white sesame seeds on almost everything. After one taste of this oatmeal, I was highly addicted. My father would cook this oatmeal every morning for himself. Since I was staying with my parents for awhile, I took over to cook this oatmeal every morning for the three of us. There are a lot of nutritional benefits in eating this oatmeal:

Goji berries: High in antioxidants and beta-carotene, rich in Vitamin A, Vitamin B complex, Vitamin C, Vitamin E and minerals. Great for eye degeneration, prevention of cancer, lower blood glucose, boosting the immune system and lowering cholesterol.

Black sesame seeds: Excellent source of magnesium, iron, calcium, copper and zinc. Supports healthy bones, muscles, blood and the nervous system. Black sesame seeds also aids in digestion and promote bowel movements. Believe it or not: some say it helps your hair stay black. I was already sprinkling roasted sesame seeds over my oatmeal before tasting my father's oatmeal, but it is even more delicious adding them ground. The nuttiness flavor of the sesame seeds is even far more intense which make this oatmeal so delicious and addicting. You just have to try this!

Oats: Great source of soluble fiber that reduces LDL cholesterol (bad cholesterol). Oats may also help stabilize blood glucose levels, which may benefit people with diabetes. Good source of protein, contains many nutrients, such as Vitamin E, zinc, selenium, copper, iron, manganese, and magnesium.

1/3 cup FINELY GROUND oatmeal (1.4 ounces)*
1 tablespoon ground roasted black sesame seeds (0.2 ounce)**
1 tablespoon dried goji berries, lightly rinsed (0.2 ounce)**
1-1/4 cups cold water (10 ounces)
1-1/2 tablespoons organic natural cane sugar (0.6 ounce) or to taste (optional)
Unsweetened almond milk, carton fresh coconut milk or soy milk

*Place old-fashioned rolled oats in a food processor and process until finely ground. This is optional. The reason why my father process his oats is because my father has Dysphagia. He is unable to swallow the whole grain of oats so he needs to have the oats finely process to make the oatmeal more smooth and easier to swallow. I really do enjoy the smooth texture of this oatmeal more than the rolled oat texture so I continue to process the oats when I cook this oatmeal for myself.

**These items can be purchased from an Asian market. Ground roasted black sesame seeds may be labeled as black sesame powder. If you cannot find the ground roasted black sesame seeds (or powder), you can easily make your own which I will post later. Dried goji berries may be labeled as Dried Medlar or Dried Wolfberries.


Microwave Cooking Instructions
In a 4-cup pyrex measuring cup or microwavable container, combine the oatmeal, ground roasted black sesame seeds and goji berries. Stir well. Add the water and stir well again. Place in the microwave oven. Cook at medium-high power (temperature 6) for 7 minutes, pausing microwave after the first 3 minutes of cooking to stir; then continue to cook rest of the time. Remove from the microwave and stir in the sugar. Transfer oatmeal to a serving bowl. Serve with unsweetened almond milk. If you choose not to process the oats to a fine ground, use 1/2 cup old-fashioned oats (1.5 ounces) and reduce the amount of water to 1 cup  (8 ounces); microwave on high power (temperature 10) for 3 minutes.
Yield 1 serving

Stove-top Cooking Instructions
In a small saucepan, combine the oatmeal, ground roasted black sesame seeds and goji berries. Add the water and stir well. Bring oatmeal to a boil on high heat, stirring frequently. When oatmeal comes to a boil, reduce heat to medium-low heat. Continue to cook for 3 minutes, stirring frequently. Remove from heat and stir in the sugar. Transfer oatmeal to a serving bowl. Serve with unsweetened almond milk. If you choose not to process the oats to a fine ground, use 1/2 cup old-fashioned oats (1.5 ounces) and reduce the amount of water to 1 cup (8 ounces); bring water and Goji berries to a boil. Stir in the oatmeal and ground roasted black sesame seeds. When mixture comes to a boil, reduce heat to medium-low heat. Continue to cook for 5 minutes, stirring frequently. Remove from heat and stir in sugar.
Yield 1 serving

Steel-Cut Oats Version


This recipe works well with steel-cut oats. I love steel-cut oats, aka Irish oatmeal. The texture of steel-cut oats are a bit more chewier with a more creamier and nuttier flavor compared to old-fashioned rolled oats. Steel-cut oats usually takes about 45 minutes to cook. I learned to reduce the cooking time to 10 minutes from watching Martha Stewart cooking Irish oatmeal on television. It really does work! I normally make a large quantity of steel-cut oats and divide the oats into serving-size portions and storing them in the refrigerator. The next morning, I would reheat one portion in the microwave.

6 cups cold water (48 ounces or 3 pounds)
6 tablespoons dried goji berries, lightly rinsed (1.2 ounces)
1-1/2 cups steel-cut oats (9.3 ounces)

6 tablespoons ground roasted black sesame seeds (1.2 ounces)
9 tablespoons organic natural cane sugar (3.6 ounces) or to taste (optional)
Unsweetened almond milk, carton fresh coconut milk or soy milk


In a large saucepan, combine the water and goji berries. Bring to a boil over high heat. Stir in the steel-cut oats. When the oats return to a boil, immediately remove from heat and cover with a lid. Let oatmeal sit at room temperature overnight.

The next morning, stir the oatmeal; then stir in the ground black sesame seeds. Cook over medium-high heat until mixture comes to a boil, stirring frequently. When oatmeal comes to a boil, lower temperature to medium-low heat and continued to cook, covered, for 10 minutes, stirring frequently. The oatmeal will splatter as it gets thicker so that is why I cover with a lid during cooking. To avoid the oatmeal splattering during stirring, remove the pot from the heat to stir, then return pot to the heat to continue cooking. When the oatmeal is cooked, remove from heat and stir in the sugar. Let oatmeal rest for 5 minutes to thicken more, covered (optional). Ready to eat or you can let it cool completely; then divide oatemal into 6 (about 9 ounces) or 7 (about 8 ounces) servings in airtight containers and store in the refrigerator for up to 1 week. Reheat each portion in  the microwave for 1:45 to 2 minutes on high power.

Yield 6 to 7 servings

Thursday, September 8, 2011

Flounder Piccata

Flounder Piccata
Adapted from Cooking Light Magazine


Four 6-ounce flounder fillets (tilapia, sole, or swai can be substituted)
Salt and ground black pepper
2-1/2 tablespoons whole wheat pastry flour or all-purpose flour (0.6 ounce)
1/3 cup dry white wine (2.6 ounces)
2 tablespoons fresh lemon juice (0.6 ounce)
1 tablespoon capers, drained and rinsed, halved or coarsely chopped (0.4 ounce)
2 tablespoons butter (1 ounce)

Pat fish fillets dry. Sprinkle both sides of each fish fillet with salt and ground black pepper. Coat each fish fillet with flour and shake off excess. Set aside.

Heat 1 tablespoon olive oil in a large nonstick skillet over medium-high heat. When hot, but not smoking, add two fish fillets to the pan. Cook EACH side for 2 minutes or until golden brown and fish flakes easily when tested with a fork. Remove to a serving platter and set aside. Repeat same cooking process with  the remaining two fillets.

Add wine, lemon juice, capers and 1/8 teaspoon salt to the same skillet. Cook for 1 minute. Add butter to the pan, stirring until butter melts. Remove from heat and spoon sauce over the fish fillets.

Serve with Microwave Steamed Spinach and Brown Rice cooked brown rice as pictured above.

Yields 4 servings

Thursday, August 25, 2011

Pasta with No-Cook Cherry Tomatoes

Pasta with No-Cook Cherry Tomatoes


Our harvest of cherry tomatoes are the best this summer. We planted a variety called, "Juliette Cherry Tomatoes": http://naturehills.com/gardening/blogs/featured_plants/archive/2009/04/09/juliette-cherry-tomatoes-are-flavorful-and-organic.aspx. These cherry tomatoes are big, sweet, juicy and meaty. I like to saute these tomatoes with vegetables or just eat them like grapes. I had over 2 pounds in the refrigerator for over a week so I decided to use them to make a pasta dish. With the inspiration from Martha Stewart's No Knife Spaghetti, I put this dish together:

2 pounds cherry tomatoes, cut in half lengthwise
1/2 cup olive oil (3.4 ounces)
4 large cloves garlic, finely minced (0.9 ounce)
1 cup packed fresh basil leaves, chiffonade (1.3 ounces)
1/2 cup finely chopped Italian parsley (0.7 ounce) 

1 tablespoon balsamic vinegar (0.3 ounce)
1 tablespoon kosher salt (0.3 ounce)
1/2 teaspoon ground black pepper
2 teaspoons dried oregano
1 teaspoon red pepper flakes
1 pound whole-wheat penne or farfalle pasta
1/2 cup grated Parmesan cheese (2.0 ounces)


In a large bowl, combine the cherry tomatoes, olive oil, garlic, basil, parsley, balsamic vinegar, salt, pepper, oregano and red pepper flakes. Toss together until well combined. Let stand at room temperature at least 1 hour or up to 4 hours to blend flavors (the longer it sits, the more flavorful). If you decide not to use them until the next day, cover bowl with plastic wrap and keep in the refrigerator until ready to use within 24 hours.

Bring a large pot of water to a boil. Add the pasta and continue to cook pasta, partially covered, for about 12 to 13 minutes or al dente. Drain pasta, but do not rinse. Immediately add hot pasta to the the cherry tomatoes mixture. Lightly toss in Parmesan cheese. Transfer to a serving dish and sprinkle more Parmesan cheese on top, if desired.

Yield 6 to 8 servings

Wednesday, August 24, 2011

Chocolate-Chocolate Chip Muffin


Chocolate-Chocolate Chip Muffins
Adapted from Cooking Light Magazine

 
Although Cooking Light already came out with a good Chocolate-Chocolate Chip Muffin recipe, it took me several modifications to come up with a moist muffin using 100% WHITE whole wheat flour. After experimenting with several types of cocoa powder, I prefer using the Dutch-process cocoa powder in this recipe which delivers a more intense chocolate taste. Replacing the water with buttermilk made the muffins more moist, tender and light. I'm pretty satisfied with these modifications. The muffins are not too sweet and perfect for breakfast.

1/2 cup semisweet MINI chocolate chips (3.2 ounces)
7.9 ounces WHITE whole wheat flour (about 1-3/4 cups)
1/2 cup packed light brown sugar (4 ounces)
1/3 cup sifted Dutch-process unsweetened cocoa powder OR Hershey's Cocoa Special Dark (1 ounce)
1-1/4 teaspoons baking powder
1 teaspoon baking soda
1/4 teaspoon salt
1 large egg, lightly beaten (1.8 to 1.9 ounces)
1-1/2 cups well-shaken cultured low-fat buttermilk (12 ounces)
1/4 cup EXTRA LIGHT olive oil or expeller-pressed canola oil (1.7 ounces)
1 teaspoon vanilla extract

Preheat oven to 400 degrees. Position oven rack to the center of the oven. Spray 11 standard-size muffin cups with nonstick baking spray. Set aside.

Measure 1 tablespoon chocolate chips (0.4 ounce) from the 1/2 cup of chocolate chips to a separate small dish. Set both aside.

In a large mixing bowl, combine the flour, brown sugar, cocoa powder, baking powder, baking soda and salt. Stir well with a whisk, using your fingers to break up any lumps of brown sugar. Set aside.

In a medium-size mixing bowl, combine the egg, buttermilk, olive oil, and vanilla. Whisk until thoroughly combined.

Make a well in center of the flour mixture. Add the entire buttermilk mixture to the flour mixture. Using a wire whisk, gently stir the flour mixture with the buttermilk mixture just until dry ingredients are moistened. Gently fold in the 1/2 cup of chocolate chips using a rubber spatula.

Divide batter among 11 prepared muffin cups, about 3/4 filled. Sprinkle with remaining reserved 1 tablespoon chocolate chips and very lightly press the chips into the batter. Bake for 16 minutes or until a wooden pick inserted in the center comes out clean. Cool for 5 minutes before removing muffins from the pan and transferring to a wire rack to cool completely.

Yield 11 muffins, approximately 224 calories per muffin

Tuesday, August 16, 2011

Semi-Home Made Chicken Sausages and Pepperoni Pizza

Semi-Homemade Chicken Sausages and Pepperoni Pizza


A new item at Safeway: fresh 16-ounce package of WHITE WHOLE WHEAT pizza dough (5 grams of fiber per serving). Regular price is $1.99 per package, but watch for some good sales coming up. The pizza dough are displayed in the Deli section of Safeway. This dough is easy to work with and bakes nicely. Easy to follow directions on the package. All I needed to do is to purchase the toppings:

Trader Giotto's Pizza Sauce (purchased at Trader Joe's)
Pepperoni (purchased at Trader Joe's under a brand name)
Part-skimmed shredded Mozzarella cheese
Mild Italian-style chicken or turkey sausages, casings removed
Thinly sliced cremini mushrooms
Sliced black olives
Frozen artichoke hearts, thawed and diced, sprinkled with some sea salt and a little olive oil
Fresh minced garlic

Place pizza stone on an oven rack position in the center of the oven. Preheat oven at 450 degrees for about 45 minutes to 1 hour.

Remove pizza dough from the refrigerator and let the dough sit out in its packaging at room temperature for 30 to 60 minutes (30 minutes if kitchen is warmer and 60 minutes if kitchen is cooler).

Meanwhile, set out a large wooden cutting board, rolling pin, pizza peel, some whole wheat pastry flour (or all-purpose flour), and corn meal. Have ready all the topping ingredients set out on the counter ready to go. Sprinkle a little corn meal on the pizza peel and set aside.

Generously dust your cutting board with flour. Unwrap pizza dough and lay on the cutting board. Dust both sides of dough with the flour and flatten first side of dough with your finger tips. Turn dough over and gently slide around to get more flour on the underside of dough. Flatten the second side of dough with your finger tips. With floured rolling pin, gently roll out pizza dough a few times just to flatten pizza dough more. Pick up dough and stretch the dough by holding the dough by the edge and stretch, turn, stretch, turn until you reach full circle. Place the dough on the knuckles of both hands (fingers turn in and don't forget to remove your jewelry). Stretch the dough by pulling your knuckles of both hands apart; then turn the dough, either right or left to rotate the dough, stretch and turn, stretch and turn until you reach full circle. It is also easier to stretch when the dough is slightly angled vertically than horizontally so that the weight of the dough can help with the stretching. Repeat the knuckle stretching until you get about 12 inches in diameter. For better clarification, you can watch this video: http://www.youtube.com/watch?v=72oe_j-0gwE

Place pizza dough on the pizza peel dusted with corn meal. Shake the pizza peel to make sure pizza dough is not sticking. Make a little dam around the edges of the dough to prevent any oil/liquid dripping off the edge of the pizza. Give pizza another shake to make sure pizza is not sticking to the peel.


Now top pizza with the pizza sauce, Mozzarella cheese, artichoke hearts, olives, mushrooms, chicken sausages, pepperoni, and some minced garlic. (I did not precook the sausages or mushrooms. When placing the chicken sausages on the pizza, just break up the sausages into very small pieces using your fingers and drop it on the pizza, like in the pizzeria. The mushrooms should be thinly sliced.) After toppings are placed on the pizza dough, it's ready to go in to the oven. Carefully shake pizza peel and slide the pizza on top of the pizza stone. Bake for 13 minutes turning pizza halfway of baking time. (Turn pizza by sliding the pizza back on the peel and turn the pizza 90 degrees and slide back on the pizza stone.)

When done, remove pizza from the oven with the peel and transfer pizza onto a pizza pan or pizza rack. Let pizza rest about 5 minutes before slicing. Slice into 8 wedges.

I made two pizza so there will be some extra slices for someone's lunch. One 12-inch size pizza will serve 2 to 3 adults.

Tuesday, August 9, 2011

Roasted Broccoli

Roasted Broccoli

This is my favorite way to enjoy broccoli. I used to steam my broccoli, but ever since I roasted broccoli in the oven, this is the only way I cook my broccoli from now on.


2-3 broccoli crowns or 1 large bunch broccoli, separated into florets with the stems attached (about 1-1/2 pounds)
4 tablespoons olive oil
1/2 teaspoon salt
1/4 to 1/2 teaspoon ground black pepper
1 tablespoon fresh-squeezed lemon juice (optional)

Preheat oven to 450 degrees. Position oven rack to the center of the oven.

In a very large mixing bowl, toss the broccoli florets with olive oil, salt and pepper. Spread the broccoli onto a shallow-rimmed baking sheet in a single layer. Roast 15 minutes or until the edges are crispy and browned and stems are crisp tender. Toss with lemon juice, if desired.

Yields 4 to 6 servings

Herb Salad with Roasted Shallot Vinaigrette

Herb Salad with Roasted Shallot Vinaigrette
Adapted from Cooking Light Magazine

This is a very simple salad with a delicious vinaigrette. What I love about this vinaigrette is that it doesn't have a lot of oil like most salad dressings have. The roasted shallot gives the vinaigrette a lot of flavor.


1 medium shallot, peeled (0.9 ounce)
2 tablespoons red wine vinegar (0.6 ounce)
1 tablespoon extra virgin olive oil (0.4 ounce)
1 teaspoon agave nectar (0.2 ounce) or sugar
1 teaspoon Dijon mustard (0.2 ounce)
1/4 teaspoon salt
1/4 teaspoon ground black pepper
One 4-ounce package of herb salad or spring salad mix


Preheat oven to 400 degrees. Position oven rack to the center of the oven.

Wrap the shallot in aluminum foil. Place shallot directly on the oven rack and roast for 35 minutes. Remove foil from oven to cool, about 10 minutes. Transfer shallot to a cutting board to finely minced the shallots.

In a small bowl, combine the minced shallots, vinegar, oil, agave nectar, mustard, salt and pepper. Stir well with a small whisk. Add salad mix and toss to coat.

Yields 2 to 4 servings

Tuesday, July 26, 2011

Quick Tahini Salad with Homemade Pita Chips


Homemade Whole Wheat Pita Chips

One package Trader Joe's Brand whole wheat pita bread (6 pita breads)
Garlic-infused olive oil
Fine sea salt

Preheat oven to 375 degrees. Position oven rack to the center position.

Working with one pita bread at a time, lay the pita bread on a cutting board. Brush the first side with about 1/4 teaspoon garlic-infused olive oil (regular EVOO will work fine). Sprinkle with a pinch of fine sea salt. Turn pita bread over. Brush the second side with another 1/4 teaspoon garlic-infused olive oil and sprinkle with a pinch of fine sea salt. Cut pita bread into 8 wedges. Repeat the same for the remainder five pita breads. Place as many pita bread wedges on an ungreased shallow-rimmed baking sheet pan in one layer, leaving some spaces between wedges. Bake for 15 minutes, until brown and crisp. Remove from oven and transfer to a plate to cool. Repeat baking with the remainder pita bread wedges. Store cooled pita chips in an airtight container for several weeks.


Tahini Salad

This is an easy and quick method to make a Middle Eastern style tomato and cucumber salad with Tahini Sauce. Tahini sauce is made from ground sesame seeds (tahini or sesame butter), garlic, lemon juice, water and salt. Tahini sauce is the sauce traditionally served with falafels and used as a dressing in falafel and schwarma wraps. Trader Joe's makes a great Tahini Sauce. Tahini sauce can easily be made from scratch, but if you don't have time to make your own, you can purchase it at Trader Joe's. This tahini salad is creamy, refreshing. delicious and healthy. With the addition of pita chips, it gives the salad a nice crunch.


One-half of an English cucumber, unpeeled and diced into 1/4-inch pieces (about 8 ounces)
1 Roma tomato, diced into 1/4-inch pieces (about 4 ounces)
4 tablespoons Trader Joe's brand Tahini Sauce (2 ounces)
1/4 teaspoon fine sea salt
4 pita chips, crumbled into bite-size pieces

Combined the cucumber and tomatoes in a medium-size bowl. Add the tahini sauce and sea salt. Toss together until combined. Add the crumbled pita chips and toss again. Transfer to a serving bowl and ready to eat.

Wednesday, July 13, 2011

Curried Grain Salad

Curried Grain Salad

This grain salad is adapted from Cafe Flora Cookbook. This is one my favorite grain salad. It's easy and quick to make. It's nutty, it's chewy, it's delicious! You can serve this grain salad as a side dish or eaten on its own like a luncheon salad.


1 cup raw pistachios, (4 ounces)
3/4 cup quinoa (5 ounces)
1-1/2 cups spelt berries (9.9 ounces), soaked in water for at least 8 hours
2 teaspoons curry powder
2 teaspoon Dijon mustard (0.3 ounce)
Juice of 1 lime (about 4 tablespoons or 1.3 ounces)
1 tablespoon honey (0.5 ounce)
3/4 teaspoon salt
1/2 teaspoon ground black pepper
1/2 cup olive oil (3.4 ounces)
1 cup dried cranberries (4 ounces)
5 to 6 slender green onions, white and green portion, thinly sliced (1.4 ounces)

Toast pistachios at 350 degrees for about 8 minutes, tossing nuts half way of baking time. Cool completely. Roughly chop nuts and set aside.

Rinse quinoa well and drain. Bring 1-1/4 cups water to a boil in a medium-size saucepan. Add quinoa and lower heat to low heat. Cover and cook for about 15 minutes or until all water is absorbed. Remove from heat and let sit, covered, for about 5 minutes. Fluff with fork. Set aside.

Place spelt berries in a medium saucepan with 5 cups of cold water. Bring to a boil, lower heat to simmer, covered, until tender, about 20 minutes. Drain well and rinse in cold water. Set aside.

Making the curry vinaigrette: In a small bowl, combine the curry powder, Dijon mustard, lime juice, honey, salt and pepper. Using a small whisk. blend all ingredients together until thoroughly combined. Dribble in the olive oil, whisking constantly until mixture is thoroughly blended. Set aside.

In a very large bowl, combine the quinoa and spelt berries. Add the entire curry vinaigrette and toss together with the quinoa and spelt berries until well combined. Next, add the cranberries, pistachios and green onions. Toss until everything are thoroughly combined. Refrigerate at least 2 hours before serving.

Yields 8 to 10 servings