>

Tuesday, November 27, 2012

Pumpkin Oatmeal

Pumpkin Oatmeal
Adapted from Clean and Delicious with Dani Spies
 
 
4 cups cold water (32 ounces)
2 cups old-fashioned rolled oatmeal (6.0 ounces)
1 cup pumpkin puree (8.0 ounces)
2 tablespoons dried cranberries, cut or tear each piece in half  (0.6 ounce)
3 tablespoons 100% maple syrup (1.2 ounces)
1/2 teaspoon vanilla extract
1/4 teaspoon pumpkin pie spice
1/4 teaspoon ground cinnamon
Pinch of ground nutmeg
Pinch of salt
 
In a medium-size saucepan, bring water to a full boil. Stir in the oats. Reduce heat to medium heat (5.0 to 5.5 on induction cook top) and continue to cook, uncovered, stirring occasionally for 7 minutes.
 
Remove from heat and stir in the pumpkin puree, dried cranberries, maple syrup, vanilla, pumpkin pie spice, cinnamon, nutmeg and salt. Let oatmeal sit for about 10 minutes, covered, before serving to thicken up. The longer the oatmeal sits, the thicker the oatmeal.
 
Serve with fresh unsweetened coconut milk (purchased from the dairy section of your grocer) or any type of milk of you desire. You can also drizzle more maple syrup to your taste and sprinkle with toasted pumpkin seeds or toasted sliced almonds.


You can also prepare the oatmeal in advance and refrigerate in portions. Let the oatmeal cool completely and divide oatmeal into five 8.0-ounce portions and refrigerate. In the morning, transfer one portion of the oatmeal to a small bowl. Heat in the microwave, covered with a paper towel, for about 1:45 minutes on high power. I ate one portion this morning so you only see four portions in the photos above.

Yield 5 servings (approximately 196 calories per serving. Calories does not include additional maple syrup, milk or nuts.)

Wednesday, November 14, 2012

Apple, Sage, and Turkey Meatloaf

Apple, Sage and Turkey Meatloaf
Adapted from Whole Foods Market


I have made this turkey meatloaf about three or four times already. Meatloaf is my favorite type of comfort food and the only type of meatloaf I make nowadays are with turkey or chicken so I am always searching for a good turkey or chicken meatloaf. This meatloaf recipe uses fresh apples which at first I didn't know whether I wanted to try this recipe because I'm not a fan of fresh fruit and meats cooked together. I recall eating Aidells Chicken and Apple Sausages and I do love these sausages, so why not try this meatloaf. I'm so glad I did because this meatloaf is really good. The apples are cooked down so you don't notice there are apples in your meatloaf, but the apples makes the meatloaf tender and moist and the sage is so aromatic. I tried the meatloaf with a combination of Granny Smith and Gala varieties. Another time I used entirely Pink Lady variety and another time I used entirely Gala variety. Each time, it turns out good.

I prefer using a food processor to grate the apples rather than a box grater. The box grater extracts a lot of juice which I didn't know whether to discard the juice or save the juice to add to the meatloaf. The juice turned brown sitting out for awhile which didn't look appetizing for me to save so I threw it out. Using a food processor gets the job done in seconds and there are no juice extracted from the apples. So if you have a food processor, use it. If you are using your box grater, I suggest grating your apples right when you are ready to use the grated apples so you can also use the juice.
 
For those who are not planning to roast a turkey for Thanksgiving, I'm thinking this will be a great alternative.
 
Apple, Sage and Turkey Meatloaf
 
2 large apples (about 1 to 1:3.0 pounds at purchase), peeled, cored and grated (12.8 to 14.1 ounces after grating) (See tip on coring apples posted at the end)
One-half of a large red or yellow onion, finely chopped (about 1 cup or 7.0 ounces)
2/3 cup dry plain bread crumbs or homemade whole-grain breadcrumbs (posted at the end) (1.7 ounces)
1/2 cup 2% reduced-fat milk (4.0 ounces)
2 pounds lean ground turkey
1 extra large egg, lightly beaten
1/4 cup chopped fresh sage leaves, finely minced (0.4 ounce)
1 tablespoon whole-grain Dijon mustard (0.5 ounce)
1/2 teaspoon poultry seasonings
2 teaspoons fine sea salt
1/2 teaspoon ground black pepper
6 tablespoons tomato sauce (3.0 ounces)
2 teaspoons agave nectar (0.3 ounce)
1/4 teaspoon fine sea salt
 
Preheat oven to 350 degrees. Position oven rack to the center of the oven. Lightly coat a large shallow-rimmed baking sheet with nonstick olive oil spray. Set aside.

In a very large mixing bowl, combine the grated apples, onion, bread crumbs and milk. Toss to combine and let sit for about 5 minutes to soften the bread crumbs.

Add the ground turkey, egg, sage, mustard, poultry seasonings, salt and pepper. Using your hands, mix until thoroughly combined. Transfer mixture to the baking sheet and shape the mixture into a 10-inch by 5-inch size loaf.

In a small bowl, stir together the tomato sauce, agave nectar and salt. Spread the mixture over the meatloaf, leaving the top more heavily coated than the sides.

Bake for 1 hour and 20 minutes. Let sand for 10 minutes before slicing and serving.

Yields 3 to 4 servings

 
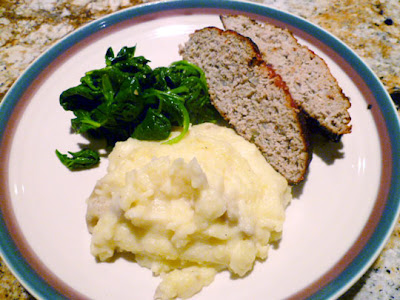
Served with mashed Yukon Gold potatoes and Microwave Steamed Spinach.
 
 
Homemade 100% whole-grain breadcrumbs: Use any 100% multi-grain, whole-grain or whole wheat bread of your choice, but make sure it is 100%. Toast bread slices in the toaster until toasty browned. Cool completely. Remove crust from each slice of toast, cut into cubes and place into the food processor. Process until fine crumbs: it may take several on/off pulses in the beginning and then let it run continuously until you achieve fine crumbs (about 2 to 3 minutes), depending on the type of bread you are using. Transfer bread crumbs to a shallow-rimmed baking sheet and spread the crumbs out evenly. Let the bread crumbs air-dry overnight to 1 to 2 days. Transfer bread crumbs to an airtight container and store in the freezer. Whenever you need bread crumbs, just scoop out a desired amount. Don't need to thaw, it can use right away.
 
Tip on coring your apples: I learn this from foodwishes.com. After peeling your apples, cut each apple into fourths. Lay each quarter on its side and trim away the core. It's so much easier to remove the core this way and you have less apples to waste. Thanks to Chef John for this tip.

Tuesday, October 23, 2012

Apple Bundt Cake

Apple Bundt Cake
Adapted from Design Sponge


I received a bag full of home grown golden delicious apples. I cannot seem to eat them fast enough and is taking up too much space in my refrigerator. I bookmarked an Apple Bundt Cake recipe from Design Sponge's website years ago. I finally gave this recipe a try and it turned out great. I'm dissappointed I didn't try this recipe sooner. The cake is not overly sweet and moist which is great to eat as a breakfast cake...or a great afternoon tea cake. This cake didn't exactly clear up the apples in my refrigerator, so I am planning to bake a second one this week because it's that delicious!
 
1 tablespoon organic natural cane sugar (0.3 ounce)
2 teaspoons ground cinnamon
4 cups diced peeled apples (about 1:3.9 to 1:6.4 pounds)*
3 cups unbleached WHITE whole wheat flour (12.3 ounces)
1 tablespoon baking powder
1 teaspoon ground cinnamon
1/2 teaspoon salt
2 cups organic natural cane sugar (13.2 ounces)
1  cup EXTRA LIGHT olive oil or expeller-pressed canola oil (7.0 ounces)
1/4 cup orange juice (2.0 ounces)
2-1/2 teaspoons vanilla extract
4 large eggs (7.2 to 7.6 ounces)
1 cup chopped walnuts or pecans, toasted and cooled (3.5 ounces)
1/4 cup powdered sugar for dusting

*Approximately 1.75 to 2.0 pounds at purchase weight. After apples are peeled, cored and diced, the weight will be anywhere from 1:3.9 to 1:6.4 pounds. I like to use Golden Delicious, Gala, Macintosh, or Pink Lady varieties.
 
Preheat oven to 350 degrees. Position oven rack to the center of the oven. Coat a 10-inch (12-cup) bundt pan or tube pan with nonstick baking spray. Set aside.
 
In a tiny bowl, whisk together the 1 tablespoon sugar and the 2 teaspoons ground cinnamon with a tiny whisk or a fork until thoroughly combined. In a medium-size bowl, combine the apples and the cinnamon-sugar mixture and toss until thoroughly combined. Set aside.

Sift together the flour, baking powder, 1 teaspoon ground cinnamon and salt into a separate medium-size bowl. Set aside.

In a large-size mixing bowl, combine the 2 cups sugar, oil, orange juice, vanilla and eggs. Using a whisk, whisk vigorously together until smooth (couple of minutes). Add the flour mixture and gently whisk together just until combined, but do not overmix. With a rubber spatula, fold in the chopped nuts.

Spread one-fourth of the cake batter into the prepared bundt pan. Evenly sprinkle in one-third of the apple mixture. Continue to alternate layers of cake batter and apple mixture ending with the cake batter. Do not need to worry whether all the apples get completely covered by cake batter. It will turn out during baking.


Bake for 1 hour or until golden brown and top springs back with lightly touched. Let cake cool in the pan for 10 minutes.


Unmold cake and continue to let cake COOL COMPLETELY on a wire rack (about 2-1/2+ hours). Make sure the bundt cake has cooled completely before dusting the powdered sugar. If cake is not completely cooled, the powdered sugar will melt.

 
Dust with powdered sugar and ready to slice and eat.

If cake is going to be left out for more than two days at room temperature, it's best to store cake in the refrigerator covered with plastic wrap or placed in an airtight container. This cake will become more moist with age.

Yield 8 to 16 slices, approximately 301 calories per 1/16 slice

Tuesday, October 16, 2012

Homemade Chicken Stock

Homemade Chicken Stock


 I LOVE soup. I can have soup even if the weather is 100 degrees outside. I crave for long-simmering soups. I don't categorize soup as soup unless it has been simmering over a stove for about 3 to 4 hours, or cooked in a slow cooker for 8 to 10 hours. The kind of soup I crave for from time to time is just rich homemade chicken stock. Homemade chicken stock is clean tasting and tastes just like...rich chicken stock. I only use two ingredients to make my rich chicken stock: just chicken and filtered water. I do not add any vegetables, herbs or spices...not even salt.  Since I like to consume the chicken meat with my stock, I use only chicken thighs. You can use chicken breast, but I find my chicken stock more flavorful using chicken thighs; plus after simmering the soup for 4 hours, the chicken thighs are still edible while the chicken breast will be very dry. So here is how I cook my two-ingredient rich chicken stock:

First remove all visible fats (or as much as you can as possible) from each chicken thighs before weighing. I purchased 3:3.5 pounds of skinless and boneless chicken thighs. After removing all the visible fats, my chicken thighs weighed 2:12.2 pounds. So 7.3 ounces of fat was removed. That is why I weigh my chicken AFTER removing all visible fats. For every pound of chicken thighs, I use 1 quart (4 cups) of filtered water. In this example, I had 2:12.2 pounds of chicken thighs and used 11 cups of filtered water.

I placed my filtered water in a large 6- or 8-quart stock pot. Bring this "soup" water to a boil.

In the meantime, I have a separate 3-quart pot filled with 3 inches of cold tap water. Bring the  tap water to a boil. When the tap water comes to a full boil, working with 2 to 3 chicken thighs at a time, add the chicken thighs to the water. Let it cook for about 10 seconds or just until the chicken thighs turns opaque in color (this is a cleaning process to remove all impurities and gunk from the chicken thighs so it will not end up in your soup). Immediately transfer the chicken to the soup water (big pot). Repeat this "cleaning" process with the remainder of the chicken thighs.

When all the chicken is added to the soup pot, wait for the soup to come to a full boil. When the soup comes to a full boil, lower heat to a simmer. Cover pot and let it cook for 4 hours, undisturbed. When 4 hours of simmering is done, remove pot from the stove and let it cool completely before transferring the pot to the refrigerator to refrigerate overnight. The next morning, remove all the cold fat that is floating on top (I had some fat floating, but hardly any). You now have rich chicken stock ready to consume. You can add salt to taste, but I prefer not to. Chicken stock that tastes this rich doesn't need it. Transfer soup to an airtight container and refrigerate for up to 1 week or place in the freezer for longer storage. This amount will last me the whole week.


NOTE: If you absolutely want to make this soup more filling, while you are reheating a portion of the soup, you can add cooked brown rice, cooked barley or quinoa, or cooked soba noodles or whole-grain pasta. At this point, you may want to add a little salt to taste. If anyone is familiar with Sweet Tomatoes Chunky Chicken Soup, this chicken broth tastes just as rich as Sweet Tomatoes (but less fat floating on top).

Wednesday, October 10, 2012

Grilled Chicken Tenders

Grilled Chicken Tenders


Tuesday, October 9, 2012

Garlic Chive with Eggs

Garlic Chive with Eggs

Garlic chives are also known as Chinese chives found in most Asian stores. Do not substitute regular chives for garlic chives. The flavor are very different. Garlic chives has a sweet, garlicky flavor while regular chives have a mild flavor of green onion or scallions. Garlic chives are great cooked with eggs. Such a simple and inexpensive dish to cook and delicious eaten with rice.

4 ounces of garlic chives
6 extra large eggs
1/2 teaspoon salt

With the garlic chives, trim off about 3/4 inches of the root ends and discard. Cut the remainder of the chives into 2-inch length slices. Chives are very dirty so it is necessary to wash the chives thoroughly in 2 to 3 changes of cold water: I dump the chives in the bowl of a large salad spinner and fill the bowl with cold water. Swish the chives around with my hand. Transfer chives to the colander of the salad spinner to drain and repeat this process one or two more times or until water is clear of sand and grit. Drain chives and spin dry using the salad spinner. Set aside.

In a medium-size bowl, beat the eggs with salt until well beaten. Set aside.

 
Heat a 10-inch nonstick skillet with about 1 tablespoon olive oil over medium-high heat (7.0 for induction cook top). When oil is hot, but not smoking, add all the chives to the pan. Continue to cook, stirring frequently, until chives are soften, about 3 minutes.


Add all the eggs to the pan and reduce heat to medium heat (5.0 for induction cook top). Let it cook without disturbance until eggs have started to set around the edges. With a wooden spoon or a silicone spatula, push the eggs that have set around the edges towards the center of the pan. Repeat this cooking process until most of the eggs are mostly set, but it's okay if some areas may still be wet (uncook). With a spatula, flip eggs over in small portions to cook the top sides, especially where the eggs are still wet. Keep flipping until all the eggs are completely cooked through, but do not overcook. Total cooking time from the time the egg is added to the pan is about 2 minutes.

 
Transfer garlic chive and eggs to a serving dish. Delicious eaten with brown or multi-grain rice. I have made a sandwich with these eggs once before and it is delicious eaten as a sandwich.
 
Yield 2 to 3 servings


Sunday, September 30, 2012

Yeasted Buckwheat Waffles

Yeasted Buckwheat Waffles

Recipe to be posted soon!


Wednesday, September 19, 2012

Sauteed Greens with Tomatoes and Garlic

Sauteed Greens with Tomatoes and Garlic

One 16-ounce package Trader Joe's brand Southern Greens Blend OR 16 ounces of your own blend of mustard greens, turnip greens, collard greens, spinach, and/or kale, large tough stems already discarded, washed well and cut up into bite-size pieces
8 ounces grape or cherry tomatoes, sliced vertically in half
2 large garlic cloves, minced (0.6 ounces)
1/2 teaspoon salt
1/4 teaspoon ground black pepper

 
Heat a 12-inch deep skillet (will need a cover for later on) over medium-high heat (7.0 for induction cook top) until hot, but not smoking. When skillet is hot, add 2 tablespoons olive oil to the pan. Swirl the pan to evenly coat the bottom. Add all the southern greens to the pan.
 
 
Cover with the lid and continue to cook, stirring occasionally, for 6 to 8 minutes. Greens will also cook down significantly. If pan becomes dry, add more olive oil as needed.

 
When 6 minutes of cooking is done, uncover pan and add the tomatoes, garlic, salt and pepper. Continue to cook, uncover, stirring frequently for 1 minute.


Remove from heat and transfer to a serving dish.

Yield 4 to 6 servings

Monday, August 13, 2012

Cashew Butter

Cashew Butter

It was a month ago when I made Cinnamon Vanilla Sunflower Butter which is now entirely consumed. I am now addicted to homemade nut and seed butter so this time I made cashew butter with great success. Using roasted cashews make this cashew butter more flavorful than store-purchased cashew butter. Store-purchased cashew butter tends to be a little thin because oil is added to the nuts during processing which gives it a thinner consistency. You can actually see the oil separation in which you always have to stir back into the nut/seed butter before using. With homemade cashew butter, you don't need to add additional oil. The natural oil from the cashews will release during processing, and that is enough to make the cashew butter a nice creamy consistency. You also have the option of adding as much or as little salt to suit your own taste. Nut butters are very easy to make as long as you have a reliable food processor (i.e., Cuisinart) or a high-power blender (i.e., Vita-Mix). It only took less than 10 minutes to make this delicious and smooth cashew butter.


1 pound package Trader Joe's brand UNSALTED roasted cashews
1/2 teaspoon salt

Place cashews in the work bowl of a food processor with a metal blade. Pulse nuts about 20 to 30 times to break up the nuts into small pieces. Then process continuously (about 7 minutes), stopping machine a few times to scrape down (about 5 to 6 times). During the processing, the cashew butter may seem tight and may clump together into one mass. With patience, it will smooth out. Just make sure to scrape down the sides of the work bowl occasionally, and spread the clumpy mass out to evenly distribute the cashew butter in the work bowl so it is not all at one side of the work bowl (like an unbalance washing machine). When the cashew butter is creamy and smooth, add the salt and process just until combined. Transfer cashew butter to an airtight container. The cashew butter will be a bit warm from the long processing. Just let it cool completely before covering and store cashew butter in the refrigerator. Can be stored in the refrigerator for up to 6 months.

Cashew butter will firm up a bit when refrigerated, but will soften quickly as you are spreading it on freshly toasted bread. You can also leave it out on the counter to room temperature to soften up.

Chunky Cashew Butter: After pulsing nuts into small pieces at the beginning of the recipe, reserve desire amount of the nuts to add back into the nut butter at the end. Follow the recipe to process the cashews until creamy and smooth. Add the reserved nuts the same time you are adding the salt. Process just until combined.

Yield 1 pound cashew butter

Thursday, July 5, 2012

Cinnamon Vanilla Sunflower Butter

Cinnamon Vanilla Sunflower Butter
Adapted from 101 Cookbooks

I am hooked on Dave's Killer Powerseed bread. Safeway supermarket is the only place I can find Dave's Killer bread at the moment. It's a little pricey, but I love the 100% whole-grain goodness and seedy texture of this bread. I've been toasting a slice of this bread for the past few morning since I came across this recipe for Cinnamon Vanilla Sunflower Butter. I didn't realize making your own nut butter can be so easy. You need a reliable food processor that can run continuously for about 10 minutes without getting hot. I have an old Cuisinart from the 80s which works just fine. I don't recommend using a mini food processor which I have already tried. Because a mini food processor is not as powerful as the standard size processor, you will not achieve the same results as you would from a standard size food processor.

2 cups raw sunflower seeds (9.6 ounces)
2 to 3 tablespoons sunflower oil
2 tablespoons honey or agave nectar
2 tablespoons vanilla extract
1 tablespoon ground cinnamon
1/2 teaspoon salt or to taste


Preheat oven to 325 degrees and position oven rack to the center of the oven. Spread sunflower seeds in a shallow rimmed baking sheet and roast in the oven for about 10 minutes, stirring half way of baking time. Remove from oven and let cool completely.


Insert a steel blade into the work bowl of a food processor. Transfer cooled seeds into the work bowl. Cover and pulse nuts about 30 times just to get the seeds to break up and become crumbly. Then continuously run for about 10 minutes until smooth, stopping machine a couple of times to scrape down sides.


When mixture looks smooth, while processor is running, drizzle in about 2 tablespoons sunflower oil. Let processor run until mixture is incorporated and becomes smooth. Add the honey, vanilla extract, cinnamon, and salt to the mixture. Continue to let processor run until smooth and well blended. Mixture will seem tight in the beginning, but let it continuously run for about 5 minutes and the nut butter will smooth out. Check the nut butter. If mixture seems too thick, add 1/2 to 1 tablespoon of the remaining sunflower oil and let it run until well blended. Taste and add more salt to taste if desired. Transfer the nut butter into an airtight container and store in the refrigerator.


This nut butter is delicious spread on toasted 100% whole-grain bread.

Yield about 1 cup

Tuesday, June 12, 2012

Hibiscus Tea (Agua de Jamaica)

Hibiscus Tea (Agua de Jamaica)

Hibiscus tea is more of a beverage than a tea. This beverage gets its rich burgundy color from the dried hibiscus flowers which is steep in boiling water for about 1 to 2 hours. While hibiscus tea does not contain any tea leaves, the steeping of the dried flowers is why this beverage is referred to as an herbal tea. I like to make my hibiscus tea a little strong so that when served over ice, the flavor will not weaken as the ice dilutes the beverage. The flavor of this beverage is a little cranberry-like and a little plum-like. This beverage is so refreshing, especially on a hot day. Without sugar, hibiscus tea is very tart so you need to add sugar to taste. I like the hibiscus tea sweet and a bit tart, like drinking cranberry juice or pomegranate juice. Dried hibiscus flowers, aka Jamaica, can be purchased at any Hispanic supermarkets sold in bulk bins.


6 cups cold water (48 ounces)
2 cups dried hibiscus (Jamaica) flowers (3 ounces)
1-1/2 cups organic cane sugar (10.2 ounces)
3 cups cold water (24 ounces)

Place 6 cups of cold water in a medium-size stainless steel saucepan which includes a lid. Bring water to a full boil. Add the dried hibiscus flower and sugar and stir to combine. When mixture returns to a boil (which is almost immediate), remove from heat. Place the lid on the saucepan and let steep for about 1 to 2 hours (I steep the flowers for about 1-1/2 hours). Strain tea through a coffee filter into a pitcher. Add the remaining 3 cups cold water. Stir and refrigerate until cold. Serve over ice.

Yield 2 quarts